May 27, 2013

Xgraph in NS2


One part of the ns-allinone package is 'xgraph', a plotting program which can be used to create graphic representations of simulation results. In this section, I will show you a simple way how you can create output files in your Tcl scripts which can be used as data sets for xgraph. On the way there, I will also show you how to use traffic generators.
A note: The technique I present here is one of many possible ways to create output files suitable for xgraph. If you think there is a technique which is superior in terms of understandablity (which is what I aim for in this tutorial), please let me know.


First of all, we create the following topology:
 
Nam snap shot
 
The following piece of code should look familiar to you by now if you read the first sections of this tutorial.


set n0 [$ns node]
set n1 [$ns node]
set n2 [$ns node]
set n3 [$ns node]
set n4 [$ns node]

$ns duplex-link $n0 $n3 1Mb 100ms DropTail
$ns duplex-link $n1 $n3 1Mb 100ms DropTail
$ns duplex-link $n2 $n3 1Mb 100ms DropTail
$ns duplex-link $n3 $n4 1Mb 100ms DropTail


May 22, 2013

NS2 installation using Ubuntu Software Center

There is an absolute easy way to install ns2 (network simulator) by using the easiest technique available on ubuntu. 
Let us install ns2 in a very nice and easy way. Ubuntu Software Center provides with ease to install different softwares by wizard.

Here is how it is done.

Open “Ubuntu Software Center” as hightlighted in the below figure.


Now, in the search box on the top right corner. Write ns2 and press enter.


You will see the package. Hit install button and it will install ns2. Ofcourse, internet connectivity is must :)
Similarly, you can install nam(network animator) by following the same procedure. Just enter "nam" in the search box and hit enter.

Install the first package that you see. And there you go, you have installed ns2 and nam .  You can always install it using terminal simply by writing the following command.

sudo apt-get install ns2 nam xgraph


Remember, when you do the same in Ubuntu 13.04, it will not show you the desired ns2 package. And you will have to install it manually. I guess this is only available for 12.04 version. So, there is another way available if you want to install ns2 in that version.

This could be resolved by applying the following command.


sudo apt-get update


When the update is completed, go and run the command to install ns2 , nam and xgraph. If you want an easy way out to install Ubuntu using windows. Please click here.


May 21, 2013

Dynamic Nodes generation and traffic flow in ns2

Here is the code for dynamically creating nodes and create traffic flow dynamically using protocol.


#Create a simulator object
set ns [new Simulator]

#Tell the simulator to use dynamic routing
$ns rtproto DV

#Open the nam trace file
set nf [open out.nam w]
$ns namtrace-all $nf


#Define a 'finish' procedure
proc finish {} {
        global ns nf
        $ns flush-trace
#Close the trace file
        close $nf
#Execute nam on the trace file
        exec nam out.nam &
        exit 0
}

#Create seven nodes
for {set i 0} {$i < 7} {incr i} {
        set n($i) [$ns node]
}


#Create links between the nodes
for {set i 0} {$i < 7} {incr i} {
        $ns duplex-link $n($i) $n([expr ($i+1)%7]) 1Mb 10ms DropTail
}

#Create a UDP agent and attach it to node n(0)
set udp0 [new Agent/UDP]
$ns attach-agent $n(0) $udp0

# Create a CBR traffic source and attach it to udp0
set cbr0 [new Application/Traffic/CBR]
$cbr0 set packetSize_ 500
$cbr0 set interval_ 0.005
$cbr0 attach-agent $udp0

April 16, 2013

EVIL IS NOTHING BUT ABSENCE OF GOOD

Professor : You are a Muslim, aren’t you, son ?

Student : Yes, sir.

Professor: So, you believe in GOD ?

Student : Absolutely, sir.

Professor : Is GOD good ?

Student : Sure.

Professor: Is GOD all powerful ?

Student : Yes.

March 31, 2013

OSPF on Packet Tracer


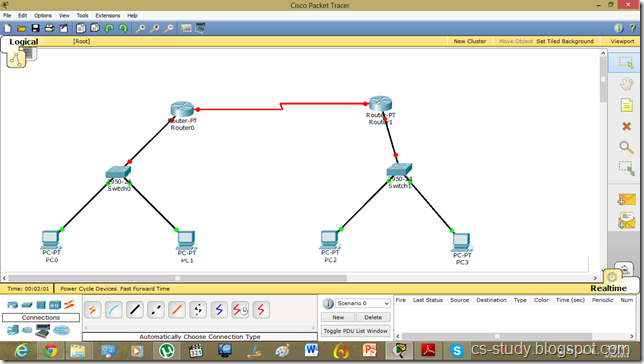
We are going to apply OSPF(open shortest path first) protocol on packet tracer. Let us take the following simple topology.

1

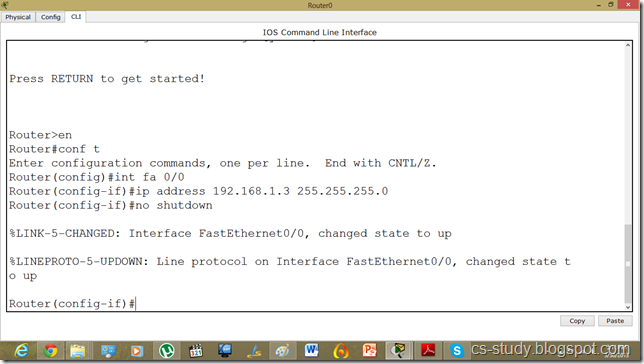
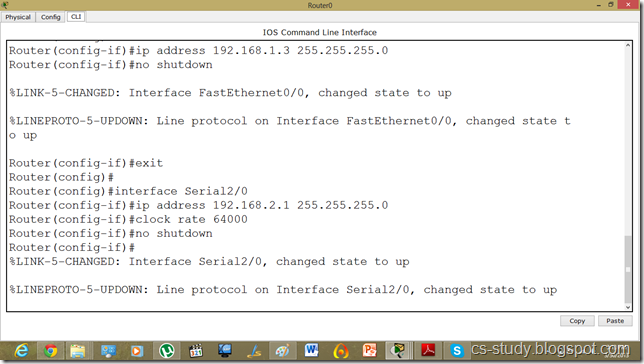
Now, let us apply the ospf on it. But before that, as usual :) , let us assign IP addresses and change the state of interfaces.

 2
3
Similarly for the other router.

March 28, 2013

Lab Manual Of Computer Communication and Networks

1 Introduction to Networking Devices https://cs-study.blogspot.com/2012/09/networking-devices.html
2 Introduction to Packet Tracer https://cs-study.blogspot.com/2012/10/what-is-packet-tracer.html
3 Packet Tracer CLI commands https://cs-study.blogspot.com/2012/10/packet-tracer-cli.html
4 Introduction to Cables https://cs-study.blogspot.com/2012/10/networking-cables-and-connections.html
5 Communication in PT, getting started .. https://cs-study.blogspot.com/2012/10/communication-between-pcs-in-packet.html
6 RIP on Packet Tracer https://cs-study.blogspot.com/2012/10/rip-on-packet-tracer.html
7 RIP V2 on Packet Tracer https://cs-study.blogspot.com/2012/10/rip-version-2-on-packet-tracer.html
8 EIGRP on Packet Tracer https://cs-study.blogspot.com/2012/10/eigrp-on-packet-tracer.html
9 OSPF on Packet Tracer https://cs-study.blogspot.com/2013/03/ospf-on-packet-tracer.html
10 DHCP on Router https://cs-study.blogspot.com/2012/10/dhcp-on-packet-tracer.html
11 DHCP on PT through Server https://cs-study.blogspot.com/2012/10/dhcp-on-packet-tracer-through-server.html
12 DNS on Packet Tracer https://cs-study.blogspot.com/2012/10/dns-on-packet-tracer.html
13 VLANS on Packet Tracer https://cs-study.blogspot.com/2012/11/vlan-on-packet-tracer.html
14 VTP on Packet Tracer https://cs-study.blogspot.com/2012/11/vtp-on-packet-tracer.html
15 Spanning Tree Protocol on Packet Tracer https://cs-study.blogspot.com/2012/11/spanning-tree-protocol-on-packet-tracer.html
16 Sticky MAC addresses https://cs-study.blogspot.com/2012/12/sticky-mac-addresses.html
17 Inter VLAN Routing (Router on a Stick) https://cs-study.blogspot.com/2012/11/inter-vlan-routing-router-on-stick.html
18 CDP on Packet Tracer https://cs-study.blogspot.com/2012/12/cdp-cisco-discovery-protocol.html
19 Telnet and SSH https://cs-study.blogspot.com/2012/12/telnet-and-ssh-on-packet-tracer.html
20 Password Authentication Protocol on PT https://cs-study.blogspot.com/2012/12/password-authentication-protocol-on.html
21 Challenge Hand Shake Authentication Protocol on PT https://cs-study.blogspot.com/2012/12/point-to-point-protocol-on-packet.html
22 Voice Over IP on PT (VOIP) https://cs-study.blogspot.com/2012/12/voice-over-ip-voip-on-packet-tracer.html
23 Wireless Communication on Packet Tracer https://cs-study.blogspot.com/2012/12/wireless-communication-in-packet-tracer.html
24 Access Control List on PT https://cs-study.blogspot.com/2012/11/acl-on-packet-tracer.html
NS2 (Network Simulator - 2) Tutorials
25 NS 2 and Ubuntu Installation https://cs-study.blogspot.com/2012/12/ns2-installation-and-ubuntu.html
26 Nodes Creation in NS 2 https://cs-study.blogspot.com/2012/12/add-following-code-to-new-file-and.html
27 Traffic Flow in NS 2 https://cs-study.blogspot.com/2012/12/traffic-flow-on-nodes-in-ns2.html
28 Dynamic Nodes generation and traffic flow in ns2    https://cs-study.blogspot.com/2013/05/dynamic-nodes-generation-and-traffic.html  
29 Xgraph in NS2  https://cs-study.blogspot.com/2013/05/xgraph-in-ns2.html
 30   Wireless Communication in NS2


December 26, 2012

Quick Sort

 
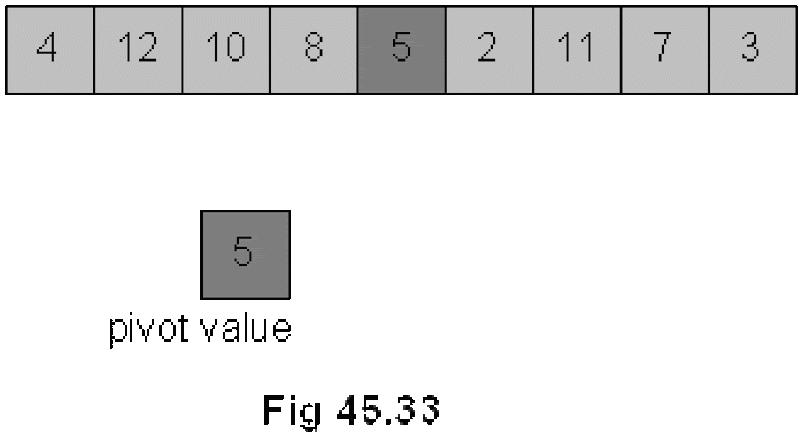
Quicksort is another divide and conquer algorithm. Quicksort is based on the idea of partitioning (splitting) the list around a pivot or split value. Quicksort is also a divide and conquer algorithm. We see pictorially, how the quick sort algorithm works. Suppose we have an array as shown in the figure Fig 45.33.
clip_image002
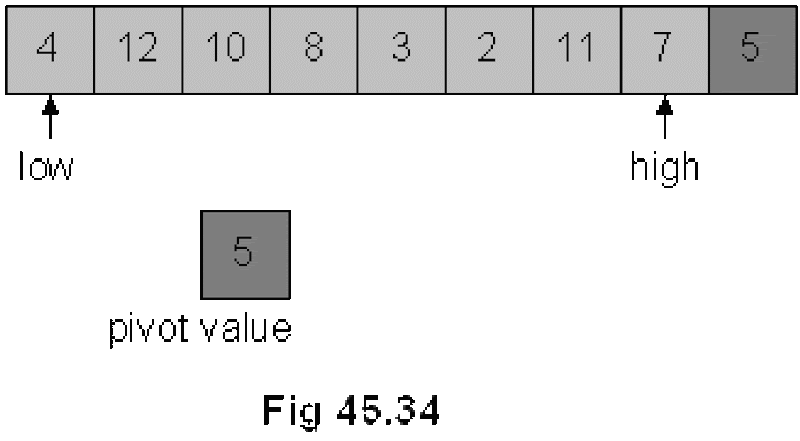
We select an element from the array and call it the pivot. In this array, the pivot is the middle element 5 of the array. Now, we swap this with the last element 3 of the array. The updated figure of the array is shown in Fig 45.34.
clip_image004
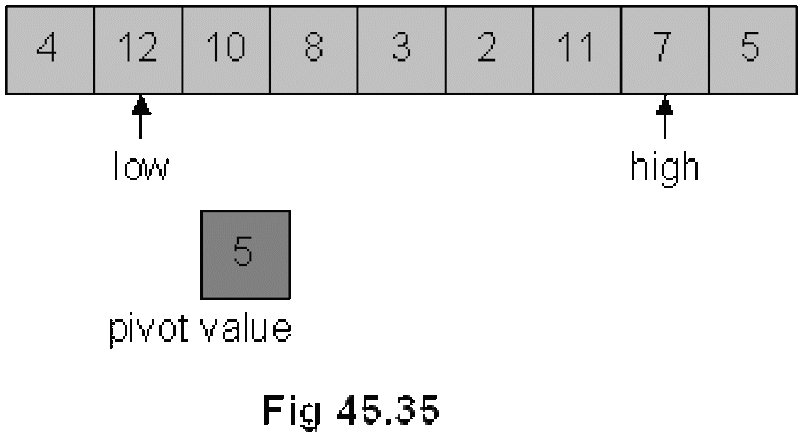
As shown in Fig 45.34, we used two indexes low and high. The index low is started from 0th position of the array and goes towards right until n-1th position. Inside this loop, an element that is bigger than the pivot is searched. The low index is incremented further as 4 is less than 5.
clip_image006
low is pointing to element 12 and it is stopped here as 12 is greater than 5. Now, we start from the other end, the high index is moved towards left from n-1th position to 0. While coming from right to left, we search such an element that is smaller than 5. Elements 7 and 11 towards left are greater than 5, therefore, the high pointer is advanced further towards left. high index is stopped at the next position as next element 2 is smaller than 5. Following figure Fig 45.36 depicts the latest situation.

C program to Read From a File

#include <stdio.h> #include <stdlib.h> void main() {     FILE *fptr;     char filename[15];     char ch;   ...